Bra Care Guide

    The last thing you want to do is ruin your best-fitting bra in the wash. We'll walk you through bra-washing 101 to get the longest life out of the bras you love most.

    First, Close the Clasp

    First, Close the Clasp

    First, Close the Clasp

    This easy (but often overlooked) first step will help prevent the hooks from snagging on the bra or in the wash.

    Always Use Mild Detergent

    Always Use Mild Detergent

    Always Use Mild Detergent

    Whether washing by hand or in the machine, use a small amount of mild detergent so it doesn't leave any residue on the bra.

    If Hand Washing, Use Cool Water

    If Hand Washing, Use Cool Water

    If Hand Washing, Use Cool Water

    Fill a clean sink or basin with cool-to-lukewarm water. Hot water breaks down elasticity more quickly, causing your bra to get looser sooner. Let it soak for up to an hour before gently rubbing between your hands to work up a light lather.

    Rinse After Hand Washing

    Rinse After Hand Washing

    Rinse After Hand Washing

    Once the water runs clean with no detergent, gently press-squeeze the excess out of the cups, but avoid wringing (and over stretching) the bra.

    If Machine Washing, Set to Delicate

    If Machine Washing, Set to Delicate

    If Machine Washing, Set to Delicate

    Always choose the delicate cycle if machine washing your bras and put them with similar colors and fabric weights (i.e. not with jeans).

    And Use a Lingerie Bag

    And Use a Lingerie Bag

    And Use a Lingerie Bag

    A mesh bag with a zipper will also work to help protect the bra from snagging in the machine or getting tangled with other items.

    Reshape After Machine Washing

    Reshape After Machine Washing

    Reshape After Machine Washing

    After the cycle is complete, remove the bra from the lingerie bag, undo the clasp and gently reshape — especially if it's a molded or padded bra.

    Always Air Dry

    Always Air Dry

    Always Air Dry

    Hang your bras to dry to avoid the extreme heat of a dryer, which can break down the fiber elasticity causing fit-altering damage to your bra.

    More Tips for Longer-Lasting Bras

    • Read the garment label before washing your bra to check for special care instructions and follow them for best results.
    • Avoid bleach. Not only will it discolor your bra, but it will also destroy the fabric.
    • Sort lighter colors from darker colors and wash them separately for best results.
    • No ironing! Just like the heat from a dryer, this will damage the bra's elastic fibers.
    • Always handwash underwire bras, even if they're the only bras you ever wash by hand.
    • Don't wait too long to wash your bra. Every 2-3 months is too long. Every 2-3 wears is more like it — and more if it's a sports bra. Even if you didn't sweat a drop, the oils from your body start transferring to the bra fabric on first contact.

    Look For the Signs

    If you've ever worn an ill-fitting bra, you know how uncomfortable it can be. Not only does improper fit cause discomfort, but it can also keep you from looking your best.

    For the past 100 years we’ve made it our mission to help women find the perfect fitting bra tailored to suit their shape. We encourage women to take advantage of our no questions asked - free shipping, free returns, free exchanges policy. Order multiple sizes to find what works best. Try them on in the comfort of your home and send back whatever doesn’t feel quite right. It’s free--we pay postage.
    • Not sure your bra is fitting the way it should? If you’ve ever experienced any of the following it’s a safe bet that you can find a better fit:

      • Your band leaves painful red marks
      • Your underwire pokes you in the chest or under your arms
      • Your bra cups have large gaps at the top or they have wrinkles
      • Your breast tissue spills out over the top of your cups
      • Your band rides up in the back
      • Your straps constantly fall off of your shoulders
      • Your bra hikes up when you raise your arms
      • Your straps dig into your shoulders
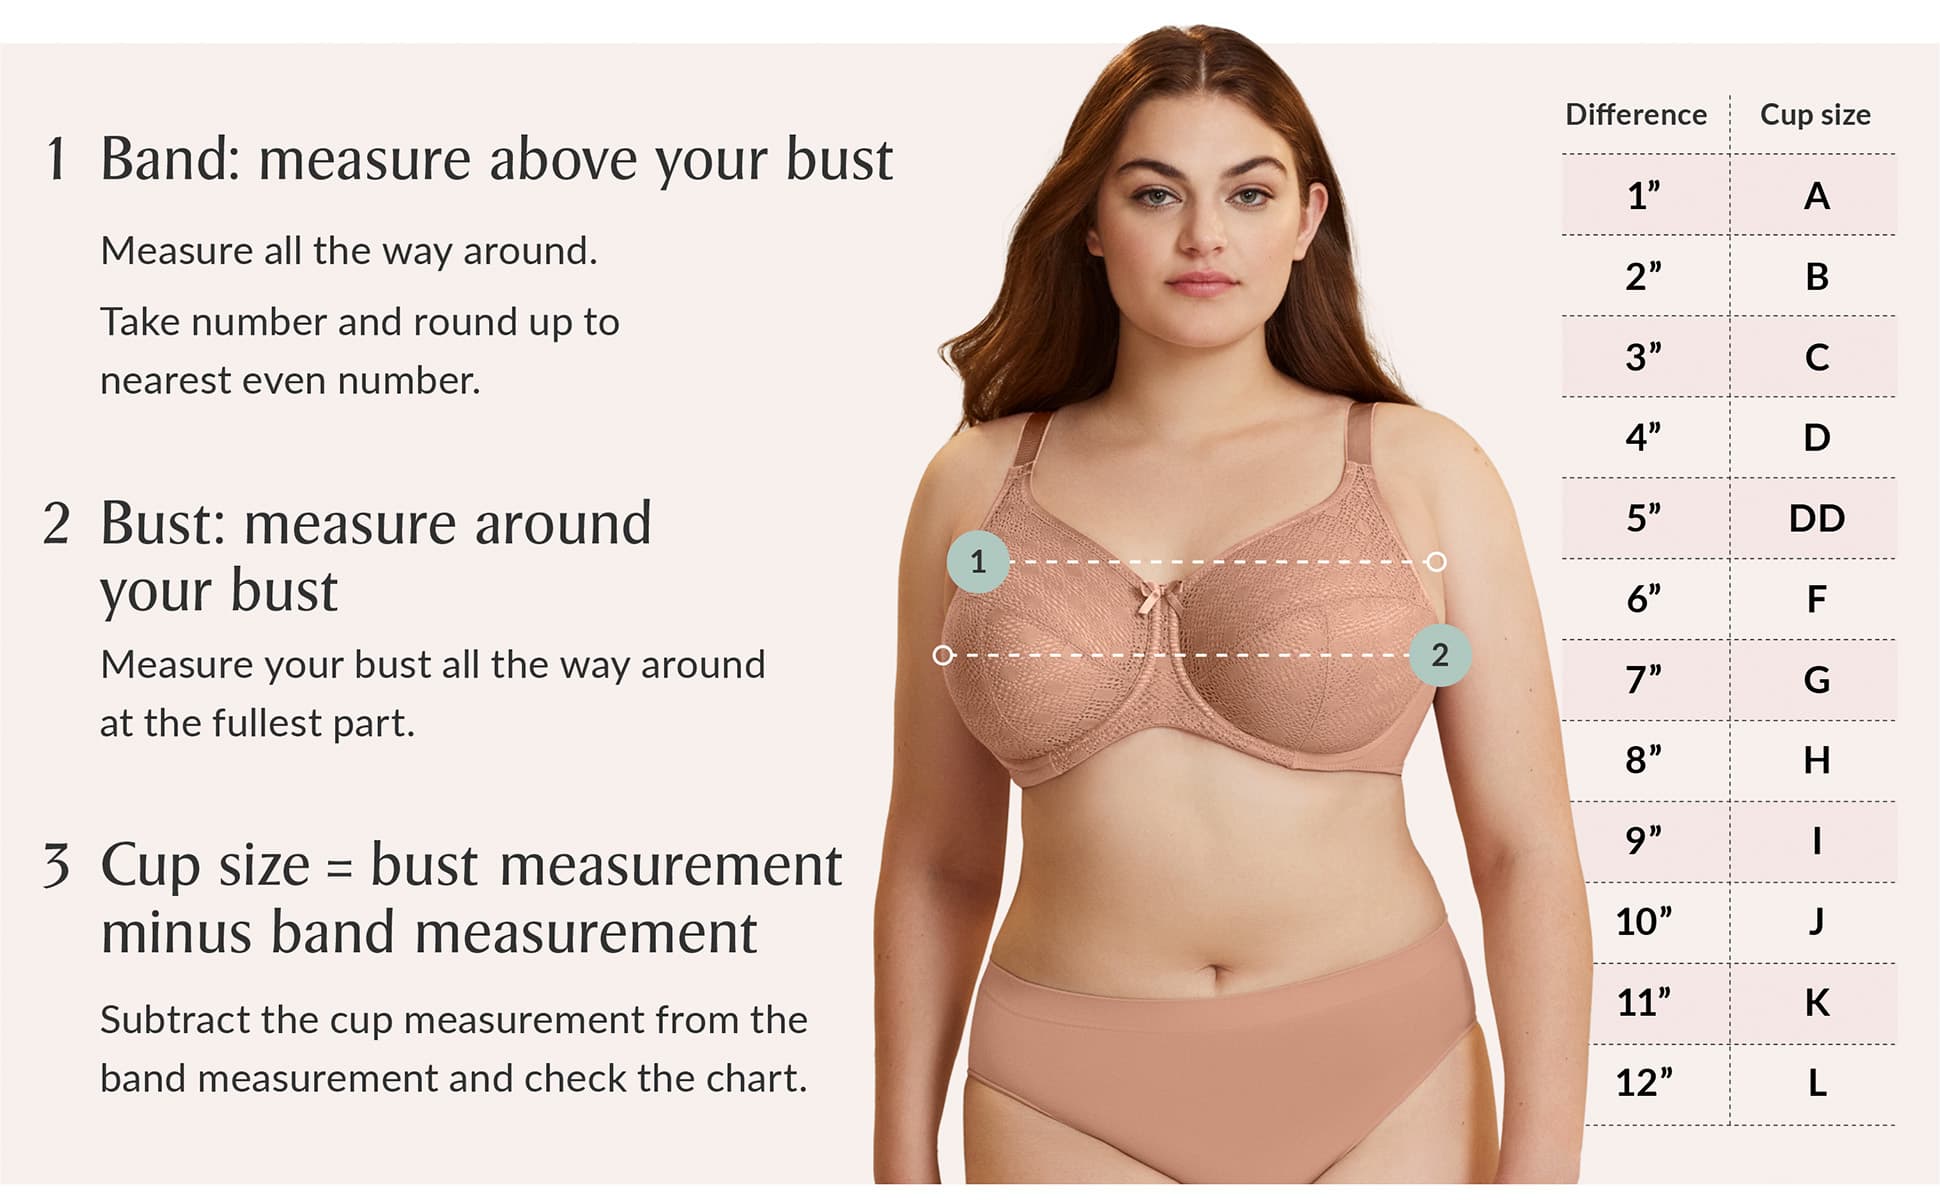
    • If you’ve never measured yourself for a bra before, don’t worry it’s easier than you think! All you need is a flexible tape measure. You can normally find them with the sewing supplies at craft stores or online. Next, put on an unpadded bra and follow these steps:
    • Wrap the tape measure around your chest under your arms just above your bust. Make sure that it’s snug but not tight. Round this number to the nearest whole number to get your band size (so 39 becomes a 40 band size).

      chart to find the perfect bra size and fit
    • Wrap the tape measure around yourself again but this time go across the fullest part of your bust. If you plug your band and bust measurements into the bra size calculator it will calculate your size. Or calculate your cup size by subtracting your band measurement from your bust measurement.

      The difference is your cup size:

      • 1 = A
      • 2 = B
      • 3 = C
      • 4 = D
      • 5 = DD
      • 6 = DDD, or F
      • 7 = G
      • 8 = H
      • 9 = I
      • 10 = J
      • 11 = K
      • 12 = L
    • Sure, but if you want your bra to fit like it was made for you and be as comfortable as possible, the best thing to do is calculate your bra size by measuring yourself.

      Enter your measurements into the bra size calculator to find the size that’s right for you. Knowing your bra size will make bra shopping a much more pleasant experience.

      Knowing how to measure yourself will also help you adjust to changes in your breasts. Gaining or losing weight, pregnancy, and aging can all cause your breasts to change size and/or shape.

    • Once you get your new bra you’ll need to make some adjustments so that it fits as perfectly as possible. When you put your bra on fasten the hooks in the back on the last set of hooks. Make sure that the band is level all around. You should be able to slip a finger underneath, but no more and no less.

      As for the cups, try the bend and scoop. After you fasten the band bend over slightly and with one hand scoop and center your breast tissue into each cup.

      Next, adjust the straps. Depending on where they adjust you may need to take your bra off if you can’t reach the back of the straps. Like the band, you should be able to slip a finger underneath the straps, but no more than two.

      After everything feels secure, take a look at how it fits. Is the band causing bulges? Are your breasts spilling out of the cups? Raise your arms and make sure that everything stays in place. If anything is off you need to re-evaluate your size or possibly the style of the bra.

      Every woman is different, and everyone has her own sense of what feels right. The calculator is only a starting point--you may choose a different size that works better for you. That’s why we encourage you to use our free return and exchange policy until you find your perfect fit.